In this article, I’m going to be covering the final ride tips for Peaks Challenge Cradle Mountain and some of the most important things to address when starting your training for the Peaks Challenge Falls Creek.
Final Tips for the Peaks Challenge Cradle Mountain
Tip One – Ensure you eat and drink regularly:
Aim to consume 30-60 grams of carbohydrate per hour every hour you are riding. There will be regular stops for food and water, but you will still need to take along additional food to supplement what is available at the stops. If you have been training off my plan, you’ll have been tuning this with your training rides leading up to the event and should have this down pat. Don’t try anything new on the day to avoid problems. Stick with what has worked for you in your training rides.
It’s important to ensure that you are drinking regularly to avoid dehydration. Make sure that you are on top of your hydration for the entire ride by sipping on your drink bottle frequently. You’ll need to drink more when it gets hotter so adjust the frequency depending on the temperature. Hopefully, you have practiced riding in hot conditions as part of your training so have accustomed your body and fine-tuned your hydration schedule.
Tip Two – Make sure that you have all your stuff together before the event:
Create a checklist in the week leading up to the event and write down all the things that you’ll need to take with you. Go through it before you leave to travel to the ride. Make sure that you have all your food and clothing sorted a few days before the ride. Nothing is worse than getting to the event only to find that you have forgotten your cycling shoes! Pack everything you think you might need, don’t plan on being able to get something when you get there. Have spares for things like lights and power leads for charging Di2.
Here is Bicycle Network’s list of items:
Compulsory:
- Helmet
- White front bike light
- Red rear bike light
- Nutritional supplies for Rider Valet Service
- 2 x water bidons
- Puncture repair kit
- Tubes
- Rain/wind jacket
- Rider ID (Event wristband and bike tag, provided at registration)
Recommended:
- Spare batteries for your bike lights
- Shoes
- Arm warmers
- Leg warmers
- Gloves
- Base layer of clothing
- Fresh change of clothes for the Clothing Valet
- Mobile phone
- Sunglasses
- Sunscreen
- Money
Designated valet collection points:
- Mayberry (66km) – Food valet service
- Moina lunch stop (110km) – Food / Clothing valet service
- Moina rest stop (177km) – Food valet service
ALSO – Makes sure that your bike is serviced. It will be checked at the event for road worthiness and you’ll need to demonstrate that you lights work prior to picking up your registration pack.
If you are traveling in a light plane to Devonport via Qantas link you may experience delays in getting your bike at the other end. This is due to the limited amount of bicycles that these smaller planes can carry. But don’t worry, Qantas will send your bike via Launceston in their bigger jets and then courier the bike to start line. Last year all bikes arrived safely at the start line around 8 pm the night before the event and I expect that this will happen this year too.
Tip Three – Wear the appropriate clothing for the conditions:
“Given the unpredictable nature of the Cradle Mountain region, you must be prepared for varying weather conditions throughout the day.” – Bicycle Network
Make sure that you have your clothing sorted. I like to have a selection of clothing packed in the valet bags along with a selection of food. This will help account for changing weather conditions and give you a few options with food depending on how you are feeling. Take a rain coat, booties, gloves, leg and arm warmers, jacket, thermal base layer, thermal socks, beanie hat and wind vest. Tassie’s weather can do anything this time of year.
Tip Four – Check your tyres and don’t take your racing tyres:
Don’t take your racing tyres. You won’t be riding in silky smooth roads over in Tassie. I recommend a sturdy tyre like the Continental Gator Skin in a 25c. The roads are rough. Pump your tyres up to 80 psi for a 25 c tyre and 100 psi for a 23 c tyre. They roll smoother at these pressures and less chance of a massive blowout. The roads are rough, so this is the optimal tyre pressure. Don’t think a higher tyre pressure is going to make you faster. That only works if the road surfaces are smooth. A higher tyre pressure won’t work for these roads.
Also, remember to check your tyres before you start the event for embedded glass that you have may pick up on previous rides. This is usually the main cause of punctures.
Tip Five – Take advantage of the bunches that will form:
If you are sitting in a bunch, you’ll be riding roughly 5 km faster for the same effort than if you are doing it alone. If you do get passed by a bunch and it’s going at a pace that you are comfortable riding at, then jump on and save some of your energy while getting a faster ride. Keep it safe though and be careful by watching out for riders that lack the necessary bunch riding skills and avoid riding behind them.
Tip Six – Keep left at all times and being courteous to other riders and road users:
It’s still important to keep left at all times. You will encounter traffic on the roads and the climbs. If you do need to stop please indicate, look back and move off the road when IT’S SAFE TO DO SO and make sure that you are well OFF THE ROAD when you are stopped. Finally, remember that many of the roads are not closed so you will have local and tourist traffic on them. Just because you are riding this mass event, please do not be arrogant and ride as if you OWN THE ROAD. Please be respectable and be courteous to all road users on the day by conducting yourself in the appropriate way.
Tip Seven – Dispose of your rubbish appropriately
“There will be bins at all rest stops along the route. However, as a Peaks Challenge rider, you are responsible for disposing of your rubbish appropriately while out on the road. Whether training or on event, follow the lead of the pros – plan ahead, tuck your gel wrappers under your knicks or in your back pocket and dispose of it when you come to a bin. We need your help to ensure that we look after this spectacular part Tasmania. The future of the event relies on your cooperation” – Bicycle Network.
Do the right thing. It’s your responsibility to dispose of your gel and sports bar wrappers into the appropriate rubbish bins provided.
Tip Eight– Wear sunscreen if the predictive UV index is high:
If the predictive UV index is high, then it’s going to be a warm day out on the bike. You’ll still be out there in the sun during the worst part of the of the day for sun exposure. Make sure you have a small tube of sunscreen on you and apply it regularly. Long sleeve lycra arm warmers will give you additional protection from the sun as well.
**Important** Tip Nine – Watch the road surfaces:
The Peaks Challenge Cradle Mountain is run on country roads and subject to rapidly changing and un-predicable weather. Be mindful of the road conditions and tailor your riding accordingly. However unlikely, there is a chance of heavy frost and road icing in the mornings and on sections of the road that don’t receive direct sunlight. Be especially careful when cornering on damp corners or when it is wet. Remember, it’s much better to take a moment and reduce your speed on a corner to successfully navigate it than to end up falling off and ending your ride prematurely due to injury.
Starting your Training for Peaks Challenge Falls Creek
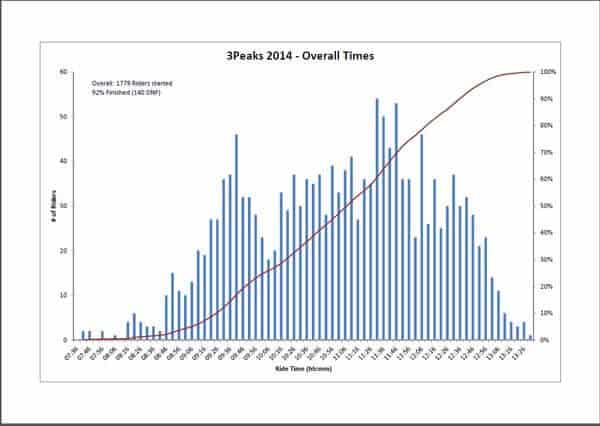
Before I get into it, I wanted to talk about the fundamentals around training for this event. The ride on average will take between ten and thirteenth hours.
During the ride, you’ll be doing a lot of climbing, over 4,000 meters which are made up of the following major climbs:
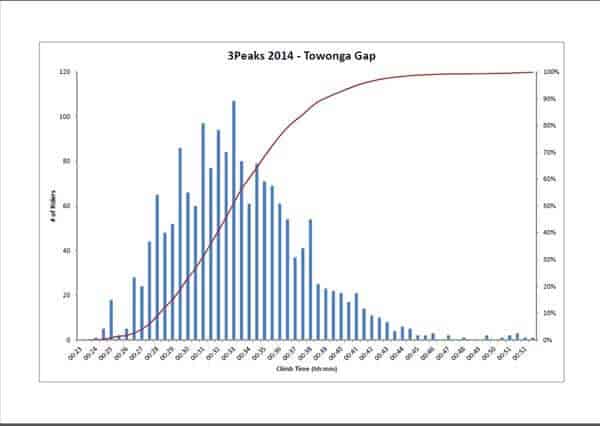
Tawonga Gap will take you on average between 28 and 35 minutes to climb:
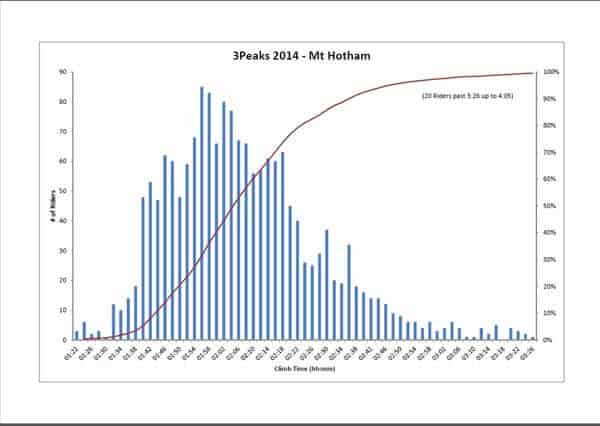
Mt Hotham will take between 1 hour forty and two hours twenty to climb.
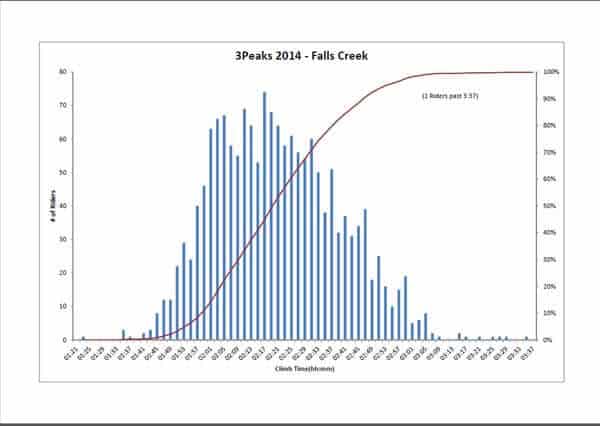
While the back side of Falls Creek will take you around 2 hours and two hours forty-five.
Based on this information, this is a long endurance event that focuses on a lot of climbing. The key things we want to achieve from the first four weeks training for this event are;
- To start building a good aerobic base so that we can build on it in weeks five to eight
- Laying the foundation of developing strength and efficiency with our hill climbing technique
As most of us have family and work commitments around which we fit our cycling training, we want to do these two things as efficiently as possible.
So this means that for the first four weeks the ideal training is based around building your aerobic base by getting out on the bike regularly and doing around nine to twelve hours of training a week for a sub thirteen hour ride and thirteen to fifteen hours a week for a sub 10 hour ride.
During this time, you’ll want to focus on the balance of these three things:
- Low-intensity endurance training during the weekends that includes spending much of the time climbing hills
- Specific long interval low cadence indoor training sessions where the focus in on good pedaling technique and low-intensity recovery rides during the week
- Off the bike specific functional strength training
It’s not the time to be sitting in fast moving bunches along flat roads or doing short high-intensity efforts on a home trainer. Also, it’s not the time for High Intensity Interval Training (HIIT). There are plenty of HIIT programs available since they became popular in the 2010’s. This training method has been enthusiastically adopted by a culture of trainers that prescribes the whole “no pain no gain” training.
However, there has been much research done in recent years that determines that building a strong base doing low-intensity aerobic training and long interval training is more efficient at improving overall fitness. This was a popular method of training in the 1980’s and is having a bit of a resurgence today.
Don’t get me wrong. There is no doubt that HIT training makes you fast, and there is a time and a place for it, but it doesn’t build aerobic endurance. That’s why the first four weeks of your training is better focused on building a solid foundation of aerobic base while working on good hill climbing technique because that’s what you’ll be drawing upon in the latter half of the ride for Peaks Challenge Falls Creek. And we use it as a foundation for the training we’ll be doing in week’s five to eight.
So here are three most important things to address in this first weeks of your training block for Peaks Challenge Falls Creek.
The basic building blocks of the training are built around an indoor training session on a Tuesday and a Thursday with recovery rides on a Wednesday and Friday and a rest day on a Monday. As most of us have the weekend available for longer rides that’s where we get out and build the bulk of our aerobic base.
The recovery rides are done at a low intensity (able to hold a conversation) and a higher cadence rpm.
The specific long interval low cadence indoor training sessions are done preferably on a home trainer with longer intervals done at a medium intensity (breathing hard but not breathless) at lower cadences with the biggest focus on developing a good efficient hill climbing pedaling technique and developing a stable core.
The weekend rides consist of getting out and riding the hills while putting together the hill climbing technique you have developed during the week.
Finally, it’s important to do body maintenance and off the bike functional strength training. Yoga is a great way of doing this or cycling specific functional strength and mobilizer exercises.
Images and statistical analysis from the 2014 ride provided by Michael Bruce

Leave A Comment